
A practical guide for dental students to recognise enamel, dentin, pulp, cementum, periodontal ligament, and oral mucosa, with annotated schematics, comparison tables, worked spotters, and viva questions.
An oral histology slide becomes much easier to identify when you stop searching immediately for a familiar pink or brown patch. Begin by asking what kind of preparation you are viewing, where the tissue lies, and what surrounds it. Only then use its finer structural features to confirm your answer.
This matters because the same tooth can look very different in a ground section and a decalcified section. A space where enamel once lay is not the same observation as preserved enamel. A vascular connective tissue inside a tooth is not identified in quite the same way as a vascular connective tissue beside its root.
The aim of this guide is to help you build an identification that you can defend: “I recognise this tissue because of its position, its structure, and its relationship to neighbouring tissues.” You will still need practice with your department’s actual slides. The original figures here are teaching schematics, clearly labelled as such; links to real microscopy resources appear near the end.
In this guide:
- Start with the preparation, not the tissue name
- A five-step sequence for an unfamiliar slide
- Enamel: begin outside the coronal dentin
- Dentin: look for the main tissue mass and its tubules
- Pulp: identify the soft tissue inside the dentin
- Cementum: trace the outer surface of root dentin
- Periodontal ligament: identify the organised attachment interval
- Oral mucosa: find the free surface and read towards the connective tissue
- Quick comparison: what should you look for first?
- Four worked spotters
- How to present your identification in a viva
- Twenty viva questions with explained answers
- Practise with real microscopy resources
- A revision routine that builds recognition
Start with the preparation, not the tissue name
Before looking for enamel rods or odontoblasts, decide what the specimen can reasonably show.
Ground sections
A conventional ground tooth section is produced by reducing mineralised tooth tissue to a thin section without first removing its mineral. It is useful for relationships between hard tissues and features such as enamel growth markings and dentinal tubules. Ordinary ground preparations do not preserve the soft tissues and their cellular detail as routine stained sections do. Special preparation methods exist, so read the slide label rather than treating “ground” as a description of every undecalcified technique.
If you can locate a pulp cavity in a ground tooth, do not claim that an empty central region proves that normal pulp has no cells. The specimen preparation determines what remains available to examine.
Decalcified, stained sections
Decalcification removes mineral so the specimen can be sectioned. In a routine decalcified tooth, mature enamel is largely lost because it contains very little organic matrix. Dentin retains an organic framework, while pulp, periodontal connective tissue, and many cells can be studied in a suitably preserved preparation.
Consequently, a crown-shaped clear region beside dentin may indicate the former position of enamel. Identify it as an enamel space or the position of enamel removed during processing, rather than pretending that the space contains intact enamel prisms.
How much can colour tell you?
Colour can help you navigate, but it should not carry the identification. In H&E, nuclei generally stain blue-purple and many protein-rich structures stain pink. Section thickness, staining quality, illumination, processing, and digital display settings affect the result. A ground section or a polarised image can have a very different appearance.
| Preparation or viewing context | Especially useful for | An important limitation |
|---|---|---|
| Conventional ground tooth section | Preserved mineralised tissue relationships, tubules, and selected enamel markings | Routine soft-tissue cellular detail may be absent |
| Decalcified tooth with H&E | Pulp, odontoblast region, periodontal tissues, and preserved organic matrices | Mature enamel is usually largely removed |
| Oral mucosal H&E section | Epithelial maturation, connective tissue relationships, glands, and muscle | A small field may not establish the exact anatomical site |
| Special stains, polarisation, or other microscopy | Particular tissue components or optical properties | Do not transfer the colour expectations of ordinary H&E to every method |
A five-step sequence for an unfamiliar slide
Use low power to orient yourself, then increase magnification to test a specific possibility. On a real microscope, use the lowest suitable objective first and follow the instrument’s focusing procedure. Do not begin by hunting at high power through a field you cannot place in the specimen.
- Check the label and preparation. Note whether the section is ground, decalcified, or a soft-tissue preparation; record the stain when given.
- Find the overall architecture. Is there a crown or root outline, a central cavity, a socket wall, or a free epithelial surface?
- Locate the tissue boundaries. Decide what lies inside and outside each region. Follow a boundary across more than one field.
- Choose two or three confirming features. Examples include tubules, a peripheral cell layer, collagen bundles, or a pattern of surface maturation.
- Check the closest alternative. Ask what would make the field dentin rather than enamel, cementum rather than bone, or pulp rather than periodontal ligament.
This is a study routine, not a guarantee that every damaged or incomplete section can be named precisely. Sometimes the correct answer is a broad tissue identification with a stated limitation.
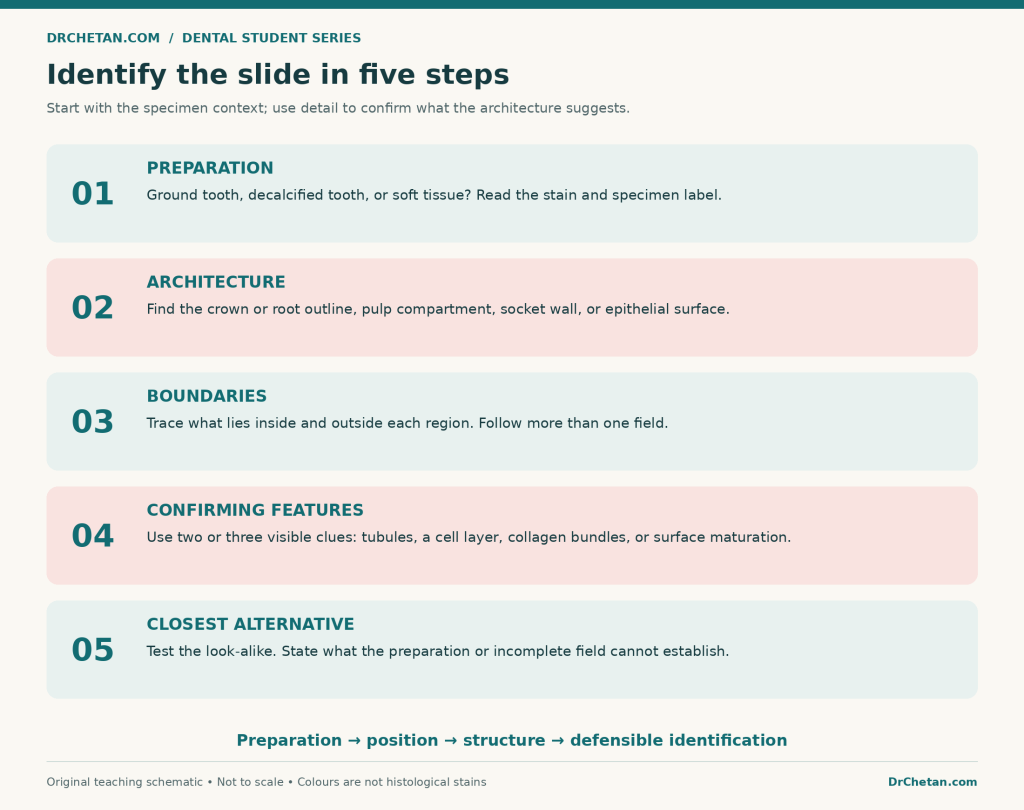
Figure 1. Use architecture to choose where to inspect, and detail to confirm the identification. This is a study framework rather than an official examination marking scheme.
Enamel: begin outside the coronal dentin
In a suitable ground tooth section, locate the crown and trace the external covering over dentin. Establish the dentinoenamel junction, or DEJ. Enamel is on the external side of that junction; the dentin forms the inner bulk of the crown.
Enamel is acellular. You should not expect a layer of living ameloblasts inside mature enamel of an erupted tooth. Developing-tooth slides are a different situation: they may show enamel-forming cells at the developing surface. Do not transfer that developmental arrangement to every adult tooth preparation.
Which enamel features help?
- Rods or prisms: structural units whose appearance depends on section direction and optical conditions. Not every teaching slide resolves them equally well.
- Striae of Retzius: incremental growth markings, often seen as curved or oblique lines in an appropriate longitudinal ground section.
- Hunter–Schreger bands: alternating light and dark optical bands related to the changing orientation of groups of rods. They are not another name for incremental growth lines.
A useful first description is: “An external coronal hard-tissue layer on the enamel side of the DEJ, with enamel-associated structural markings in this preparation.” Add the specific marking only if you can actually demonstrate it.
Do not label every dark line as an enamel feature
Cracks and grinding damage can produce conspicuous lines. A published ground-section teaching specimen may show both genuine markings and processing cracks in the same field. Examine a line’s course, neighbouring tissue, and consistency with the proposed structure. One isolated jagged line is weak evidence for a named growth feature.
Dentin: look for the main tissue mass and its tubules
Dentin forms most of the tooth’s hard-tissue bulk. It lies beneath enamel in the crown and beneath cementum in the root. In a suitable section, the most useful confirming feature is the pattern of dentinal tubules extending between the pulpal region and the outer dentin boundary.
Longitudinally sectioned tubules may appear as fine linear or curved tracks. Tubules cut across may appear as small profiles rather than long lines. A different cutting plane does not create a different tissue: it changes the view of the same three-dimensional arrangement.
Where are the odontoblast cell bodies?
Odontoblast cell bodies line the peripheral pulp, adjacent to predentin. Their processes extend into dentinal tubules. Do not identify the tubules themselves as rows of complete odontoblast cell bodies buried throughout dentin.
This distinction makes the dentin–pulp border especially useful. If preserved, it provides a sequence you can follow: dentin, predentin, odontoblast layer, then the softer pulpal tissue.
Predentin is a band, not an empty gap
Predentin is the unmineralised organic dentin matrix at the pulpal surface of dentin. In an appropriate stained section it may appear as a paler band between dentin and odontoblasts. Its actual appearance depends on processing, stain, and functional activity.
Confirm its position before naming it. A pale patch somewhere in the middle of dentin, or a retraction gap separating tissues, is not automatically predentin. Also avoid assuming that every microscopic dentin region can be classified as primary, secondary, or tertiary from a tiny field without its wider context.
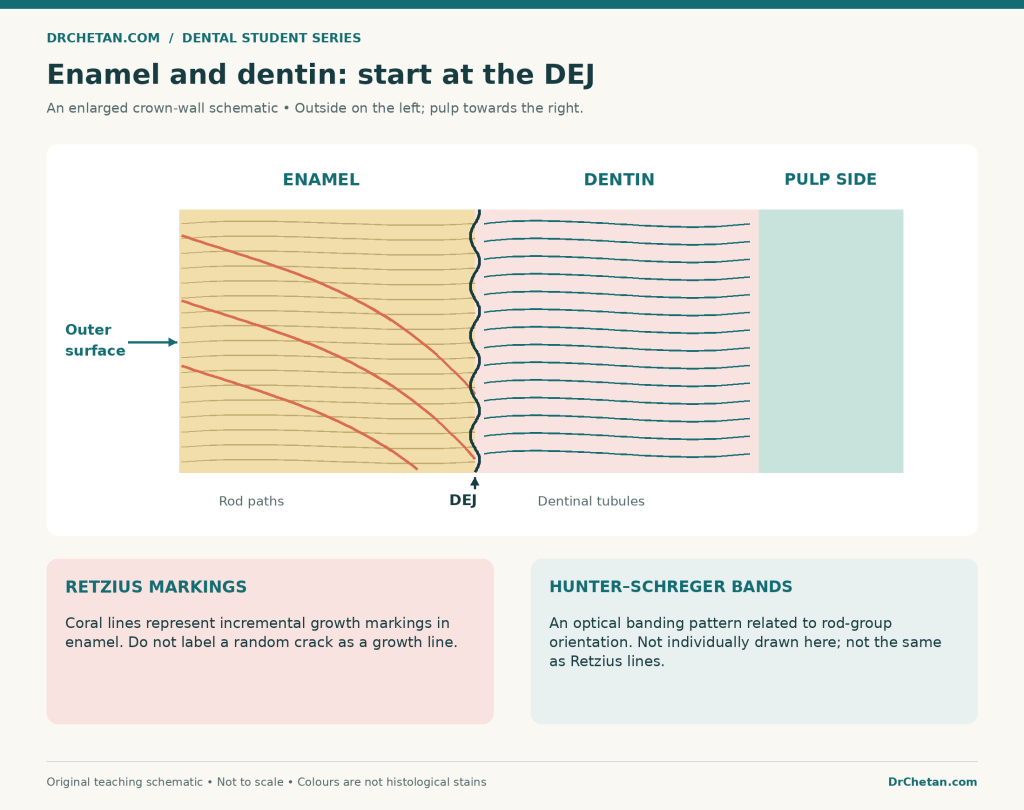
enamel dentin slide recognition
Figure 2. Schematic relationships in a crown section. Lines are deliberately enlarged for teaching; the drawing is not a micrograph, a scale drawing, or a substitute for identifying actual markings.
Pulp: identify the soft tissue inside the dentin
Pulp is specialised connective tissue occupying the central compartment of the tooth. In a preserved section, look for cells, connective tissue, and vascular profiles inside the dentin boundary. The peripheral odontoblast region helps confirm that you are examining the dentin-pulp complex.
Pulp and periodontal ligament both contain connective tissue, vessels, and nerves. Their location separates them immediately: pulp is inside the tooth’s dentin enclosure; periodontal ligament is outside the root, between cementum and socket bone.
The conventional pulpal zones
From the dentin side towards the centre, students commonly learn:
- Odontoblast layer.
- Cell-free zone of Weil.
- Cell-rich zone.
- Central pulp or pulp core.
The cell-free zone is relatively cell-poor, not an empty space without biological contents. These zones are best demonstrated in suitable coronal pulp; they need not appear as four crisp, equally thick stripes in every section or throughout the root canal.
When the specimen does not resolve every zone, describe the structures you can see. Identifying pulp does not require inventing an invisible boundary between two textbook zones.
What can you confidently call a vessel or nerve?
A recognisable vascular profile usually has a lumen with a lining and may contain erythrocytes. A processing hole lacks that organised relationship. Fine neural detail may be difficult to establish in routine sections, so “pulp contains nerves” is not evidence that an arbitrary dark strand in your field is a nerve bundle.
In a viva, distinguish what the tissue normally contains from what this particular field demonstrates. That distinction makes your answer more accurate and easier to defend.
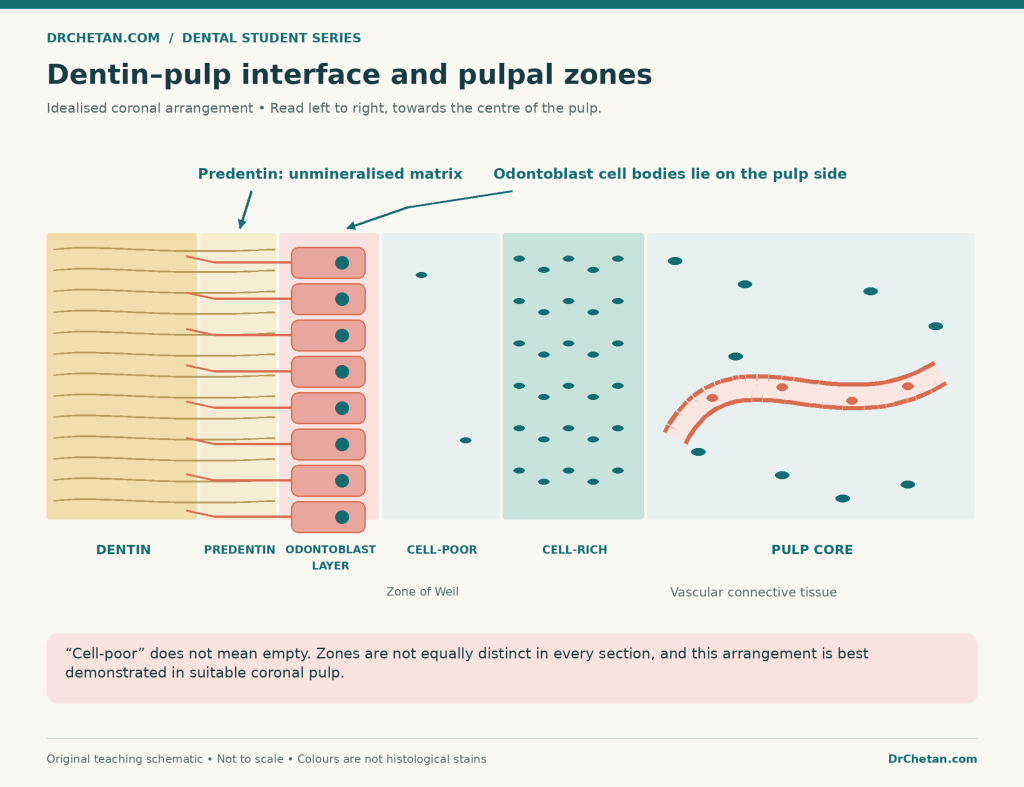
Figure 3. An idealised coronal arrangement. Zone thickness and cell sizes are exaggerated; the cell-poor zone is not an artificial tear or a truly empty layer.
Cementum: trace the outer surface of root dentin
Locate the root first. Cementum is the mineralised covering on the external surface of root dentin, facing the periodontal ligament. It may be a very thin layer in one region and more substantial elsewhere, particularly towards apical or interradicular regions.
Position is essential. A small fragment of mineralised tissue cannot always be named as cementum from colour or one cell-containing space alone. Trace it back to root dentin and its periodontal relationship when the section permits.
Acellular and cellular cementum
Acellular cementum lacks cementocytes embedded within its matrix. “Acellular” does not mean that the surface and surrounding tissues have no cells: cementoblasts may lie along its external surface.
Cellular cementum contains cementocytes in lacunae. It is often demonstrated in apical and furcation regions. The familiar cervical-versus-apical distribution is a helpful teaching pattern rather than a rigid rule that every microscopic field must follow.
Cementum versus alveolar bone
Both can contain a mineralised matrix and cells in lacunae. Cementum is normally avascular and lies on the root. Bone forms the socket and has its own vascular organisation; a chosen thin field need not show a conspicuous osteon. Do not rely on the presence or absence of one round-looking structure to decide between them.
Your strongest explanation is relational: root dentin ? cementum ? periodontal ligament ? alveolar bone.
Periodontal ligament: identify the organised attachment interval
The periodontal ligament, or PDL, is the connective tissue between root cementum and alveolar bone proper. In an intact preparation, identify both sides of this interval before focusing on the fibres within it.
Confirming observations may include collagen bundles, elongated connective-tissue cell nuclei, and blood vessels. Bundles can appear wavy, oblique, or cut across depending on their course and the section plane. The PDL is not simply a featureless empty gap.
The inserted portions of the principal collagen bundles in cementum and bone are called Sharpey’s fibres. Recognising an attachment relationship is more convincing than pointing at any pink line and giving it this name.
What about the epithelial rests of Malassez?
These are residual epithelial cell populations associated with Hertwig’s epithelial root sheath. They can occur as small clusters or strands in the periodontal ligament, often close to the root surface. They are not the same thing as the odontoblast layer, cementocytes within cementum, or an inflammatory infiltrate.
A routine field may not show them clearly. Their absence from your chosen view does not rule out the PDL, and one unidentified cluster does not establish a cyst or another disease.
Do you need to name every PDL fibre group?
Learn the standard groups required by your curriculum, but do not assign a group from an isolated cropped bundle when its position is unknown. A root-level overview is needed to relate the bundle to the alveolar crest, root sides, apex, or a furcation. For first identification, establishing a collagenous attachment between cementum and socket bone is the priority.
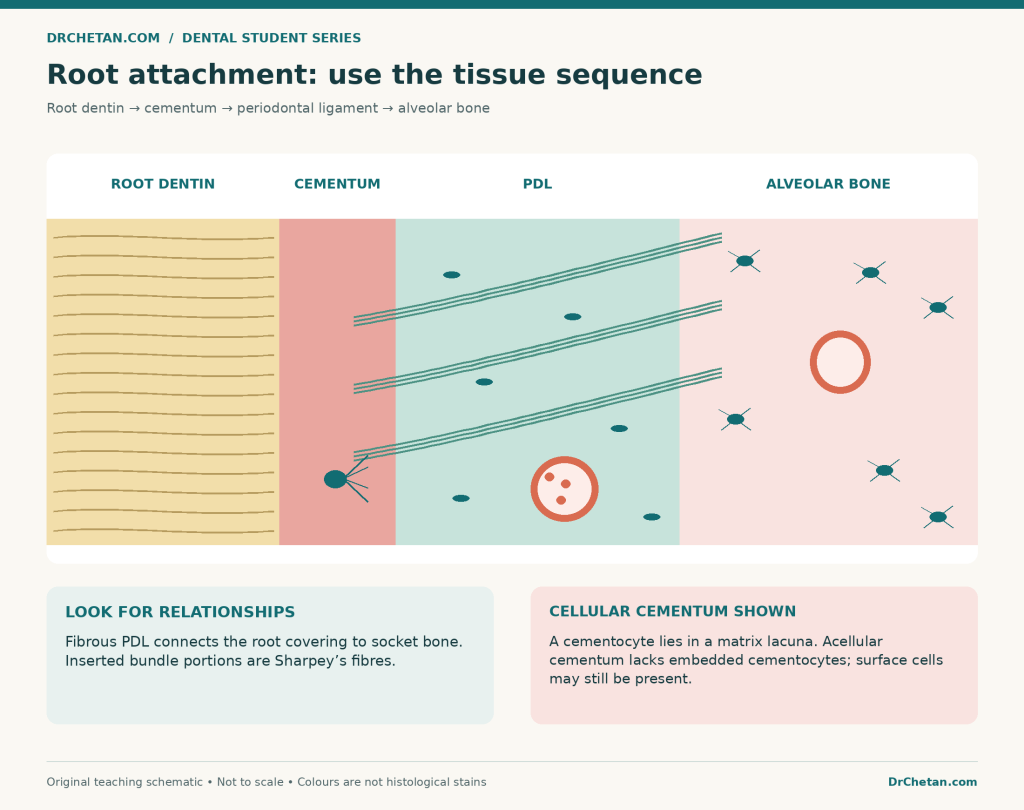
Figure 4. Follow the tissues across the root–socket interface. Relative widths, fibres, and cellular details are exaggerated; this is an original schematic, not a stained specimen.
Oral mucosa: find the free surface and read towards the connective tissue
In an oral mucosal section, begin at the surface. Identify the stratified squamous epithelium, then its interface with the connective tissue of the lamina propria. Examine deeper tissues for additional context, such as minor salivary glands, adipose tissue, skeletal muscle, or attachment towards bone.
The oral epithelium is avascular; vessels lie in the underlying connective tissue. The epithelial–connective tissue interface may be interdigitated: epithelial rete ridges project downwards, while connective tissue papillae project upwards. In a single oblique section, these projections may appear as separate profiles, so follow the architecture before assuming they are isolated lesions.
Keratinised mucosa
In an orthokeratinised surface, the superficial cells have lost their nuclei. A granular layer may be identifiable below the superficial keratin. In parakeratinised epithelium, the surface retains small pyknotic nuclei, with a less prominent or incomplete granular layer. Retained surface nuclei therefore do not automatically mean that a specimen is nonkeratinised.
Nonkeratinised mucosa
Nonkeratinised stratified squamous epithelium retains nuclei in its superficial cells without the distinct cornified surface layer of orthokeratinisation. It is still stratified: a beginner’s mistake is to see flattened surface cells and call the entire epithelium simple squamous.
Connect the pattern with the likely region
| Mucosal category | Typical location | Useful recognition context |
|---|---|---|
| Masticatory mucosa | Attached gingiva and hard palate | Usually keratinised or parakeratinised, with supporting connective tissue suited to mechanical stress |
| Lining mucosa | Inner lips and cheeks, alveolar mucosa, floor of mouth, ventral tongue, and soft palate | Usually nonkeratinised; deeper tissues vary with the anatomical region |
| Specialised mucosa | Dorsal tongue | Lingual papillae, with taste buds in appropriate papillae; underlying skeletal muscle is useful context |
This table describes typical normal patterns. Keratinisation alone does not prove a precise site: a small epithelial fragment can be insufficient to distinguish one oral location from another. Regional variation, section orientation, and pathological change can complicate the appearance.
A useful tongue distinction
Filiform papillae are pointed mechanical projections and do not contain taste buds. Circumvallate papillae have a surrounding trench, with taste buds in the epithelium along its walls; deeper serous glandular tissue can add context. Skeletal muscle bundles cut in different directions support a tongue identification.
Do not confuse a connective tissue papilla beneath an epithelial sheet with an entire named lingual papilla. They describe different levels of organisation.
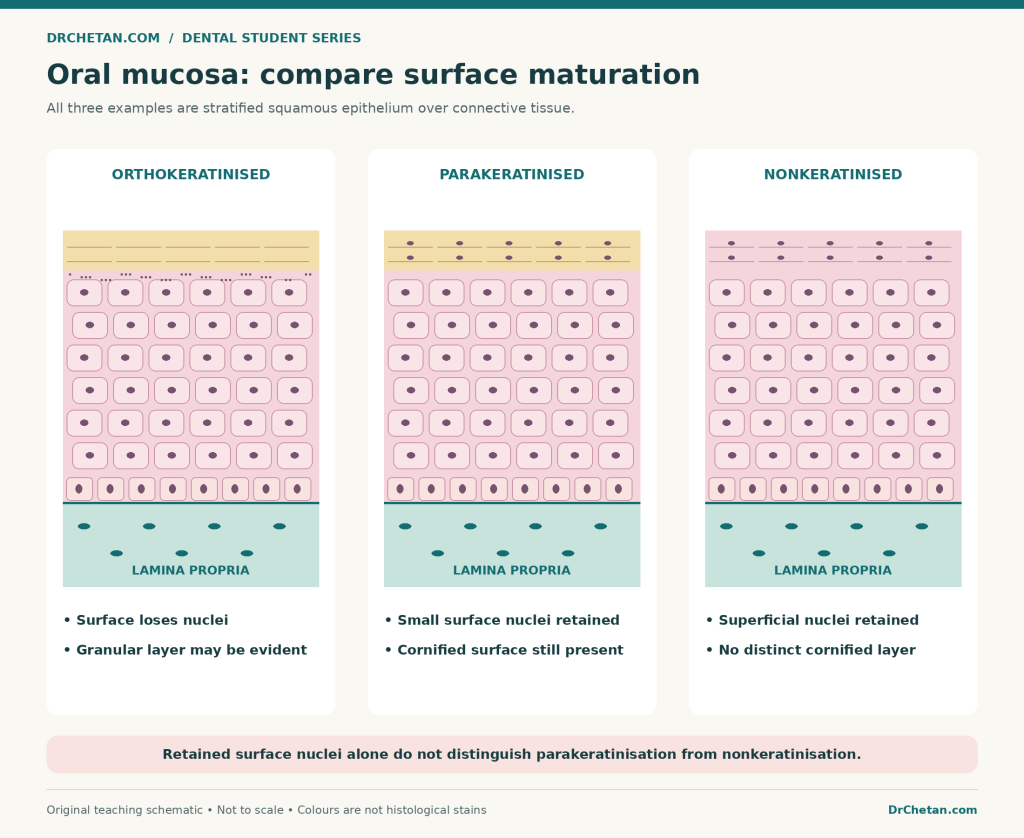
Figure 5. Idealised maturation patterns. All three epithelial examples overlie connective tissue; colours and layer widths are schematic rather than diagnostic staining standards.
Quick comparison: what should you look for first?
| Tissue | First orienting clue | Confirming observations | A common mistake |
|---|---|---|---|
| Enamel | External covering of coronal dentin in a suitable preparation | DEJ relationship; enamel structural or growth markings when visible | Calling an empty enamel space intact enamel |
| Dentin | Main hard-tissue mass around the pulp compartment | Dentinal tubules; appropriate predentin and odontoblast relationship | Placing odontoblast cell bodies throughout the tubules |
| Pulp | Soft tissue within the dentin enclosure | Connective tissue and vessels; peripheral odontoblast region | Demanding that every section display all textbook zones |
| Cementum | Covering outside root dentin | Matrix layer, with or without embedded cementocytes | Naming it solely because a lacuna is visible |
| PDL | Connective tissue between cementum and socket bone | Collagen bundles, cells, vessels, and attachment relationships | Calling a processing tear the PDL |
| Oral mucosa | Stratified squamous epithelial free surface with lamina propria | Surface maturation and deeper anatomical context | Inferring an exact site from surface keratin alone |
Four worked spotters
These are fictional descriptions for practising reasoning. They are not diagnoses of unseen patient specimens.
Spotter 1: an empty outer crown region
Observation: A decalcified tooth section shows a central connective-tissue compartment surrounded by dentin. Outside the coronal dentin is a clear region corresponding to an external crown covering.
Reasoning: The preparation makes loss of mature enamel plausible. The clear region’s position supports an enamel space rather than a new soft tissue. Confirm the crown orientation and review the slide’s processing details.
A defensible answer: “This is a decalcified tooth section. The clear coronal region corresponds to enamel removed during processing; preserved dentin and central pulpal tissue help establish the orientation.”
Spotter 2: a thin peripheral layer beside a fibrous interval
Observation: Tubular hard tissue is covered externally by a thinner mineralised layer. Beyond that layer lies a collagenous connective-tissue interval, with bone on its opposite side.
Reasoning: The sequence establishes a root–socket relationship. The thin root covering is consistent with cementum, and the connective interval is consistent with PDL. Lack of visible cementocytes would not exclude acellular cementum.
A defensible answer: “The sequence of root dentin, cementum, periodontal ligament, and socket bone supports identification of the root attachment apparatus.”
Spotter 3: a pale band at a hard–soft tissue boundary
Observation: A tubular matrix is followed internally by a paler continuous band, then a peripheral cell layer and vascular connective tissue.
Reasoning: In this location the pale band is compatible with predentin. The neighbouring odontoblast region and pulp support the interpretation. A torn edge or a pale area elsewhere would not provide the same evidence.
A defensible answer: “The band is consistent with predentin at the dentin–pulp interface, adjacent to the odontoblast layer.”
Spotter 4: superficial cells still have nuclei
Observation: A stratified squamous epithelial surface retains small dark nuclei. The superficial layer appears cornified, while the granular layer is inconspicuous.
Reasoning: Retained nuclei do not by themselves establish nonkeratinisation. Examine the entire maturation pattern; this combination is compatible with parakeratinisation. Precise oral site identification requires more context.
A defensible answer: “The surface maturation is consistent with parakeratinised stratified squamous epithelium; I would use the deeper tissues and specimen label to assess the site.”
How to present your identification in a viva
Use a short answer that moves from observation to conclusion:
Preparation ? tissue or region ? two visible features ? relevant limitation.
For example: “This appears to be a decalcified tooth section. I identify the dentin–pulp interface because a tubular matrix is adjacent to predentin and a peripheral odontoblast region. The finer pulpal zones are not clearly resolved in this field.”
That is more useful than listing every fact you remember about pulp. If the examiner asks for tissue function or developmental origin, add it as a separate answer. Keep the distinction between knowledge of the tissue and evidence in the slide.
If you are uncertain, name the exact uncertainty. “I can identify stratified squamous oral mucosa, but this field does not establish its precise site” is clearer than guessing a specific cheek or palate location without supporting structures.
Twenty viva questions with explained answers
These are original study questions, not reproduced university examination questions.
- Why ask about the preparation first? It determines which tissues and structures are likely to be preserved. A ground tooth and a routine decalcified tooth cannot be expected to show identical detail.
- Why may mature enamel be absent from a decalcified section? Mineral removal leaves very little of its original framework because mature enamel has little organic matrix.
- Does an empty pulp cavity prove that pulp is acellular? No. An ordinary ground preparation may not retain its soft tissue; interpret the preparation before inferring normal biology.
- What is your first spatial clue for enamel? Its position external to coronal dentin, across the DEJ, in a preparation that preserves it.
- Are Retzius lines and Hunter–Schreger bands interchangeable terms? No. The first are incremental markings; the second reflect the optical consequences of rod-group orientation.
- Which feature commonly confirms dentin? Dentinal tubules within the tooth’s main hard-tissue mass, interpreted with the surrounding anatomy.
- Where are odontoblast cell bodies? At the pulp periphery next to predentin; their processes extend into dentinal tubules.
- What is predentin? Unmineralised dentin matrix at the pulpal dentin surface, not an empty processing gap.
- What most quickly separates pulp from PDL? Position: pulp is within the dentin enclosure, while PDL is outside the root between cementum and bone.
- Is the cell-free zone of Weil literally empty? No. It is a relatively cell-poor region and can contain vascular and neural elements; its visibility varies.
- Must every pulp slide show four distinct zones? No. Region, activity, sectioning, and preservation affect their appearance.
- How do you locate cementum? Trace the external root dentin surface towards the adjacent periodontal ligament.
- What makes cementum cellular? Cementocytes embedded in matrix lacunae. Surface cementoblasts alone do not make the underlying cementum cellular.
- Can cementum and bone be separated by a lacuna alone? No. Both can contain lacunae; root-versus-socket position and vascular organisation add the necessary context.
- What are Sharpey’s fibres? The inserted portions of principal collagen bundles in cementum and alveolar bone.
- What are epithelial rests of Malassez? Residual epithelial populations associated with HERS, found in the PDL. They need not be visible in every field.
- What are the two basic components of oral mucosa? Surface stratified squamous epithelium and underlying connective tissue, the lamina propria.
- How does parakeratinisation affect interpretation of surface nuclei? Small retained superficial nuclei can be present in a keratinised surface, so nuclei alone do not prove nonkeratinisation.
- Do filiform papillae have taste buds? No. They are mechanical papillae; taste buds occur in other appropriate lingual papillae.
- What should you do when a field is incomplete? Identify the level supported by visible evidence, explain the limitation, and inspect a wider field or the specimen information when available.
Practise with real microscopy resources
The figures in this article simplify relationships. For genuine pattern recognition, compare them with actual sections and your departmental teaching collection. At each link, first identify the preparation and orient yourself before revealing or reading labels.
| Resource | Suggested task |
|---|---|
| Digital Histology: ground tooth overview | Find crown and root, then trace enamel, dentin, and cementum |
| Digital Histology: decalcified tooth overview | Compare preserved tissues with the former enamel position |
| Digital Histology: dentin–pulp interface | Locate dentin, predentin, and the odontoblast region |
| Digital Histology: periodontium | Follow cementum, PDL, and alveolar bone in sequence |
| University of Leeds: mouth, lip, and teeth | Compare tissue architecture before inspecting the tooth and lip labels |
| Histology Guide: circumvallate tongue | Find the trench, epithelial taste-bud profiles, and deeper muscle |
Published teaching pages may contain simplified descriptions or specimen-specific appearances. Use their images alongside a current prescribed text and your demonstrator’s guidance rather than treating one website label as an exceptionless rule.
A revision routine that builds recognition
For each tissue, make a small record with four entries: position, two confirming features, closest alternative, and preparation limitation. Then test the same tissue in another section or at another magnification. If identification fails when the colour changes, return to the tissue relationships.
Do one pass with labels visible, a second with labels hidden, and a third in which you explain the answer aloud. Ask a partner to challenge one feature: “Why is this cementum rather than bone?” or “Why is this band predentin rather than a tear?” Your answer should lead back to something demonstrable in the specimen.
The skill you are building is not recognition of one memorised picture. It is the ability to connect preparation, architecture, and detail across different views of the same tissue.
Leave a Reply